
In my last post (read here), I talked about the benefits of visual schedules and why I think they work. In this post, I would like to talk more about how I create my visual schedules. As mentioned in my last post, I am writing more specifically about individualized visual schedules for students with needs, but this same format can also be so helpful in larger format on the board for the whole class. Especially the “First this…then…” part, as it gives students a clear picture of what they should be doing, and what they will be doing next.

Getting Started
My school works on a 6 day cycle. The first thing I do is look at their class schedule over the 6 day cycle and question whether or not the student in question can follow the class schedule completely. Many of the students I’m working with need more movement, rest and preferred activities interspersed throughout their day. I work in an elementary school (k-8). Most of the kids I am planning for can work for 15-30 minutes at a time. I try as much as possible to alternate between high energy/heavy work and calm work. This means if I have the student sitting at the carpet for a decent amount of time, the next activity needs to include some form of movement or heavy work. It may be something that the whole class is doing, or heavy work that just that student is doing. Either way, I make sure that I get the student moving often.
A typical day may look something like this:
- 8:30 Breakfast and story time (calm)
- 9:00 Plasma car (heavy work & preferred activity)
- 9:15 Guided reading (calm)
- 9:30 Phys. Ed (heavy work & preferred activity)
- 10:00 Recess (heavy work & preferred activity)
- 10:15 Snack & quiet time (calm)
- 10:30 Carry books to library and change books (heavy work).
- 10:45 Printing practice (calm)
- 11:00 Wall exercises and yoga poses (heavy work)
- 11:15 Kinetic sand (calm & preferred activity)
- 11:30 Math (calm)
- 11:45 lunch & recess (heavy work & preferred activity)
- 12:45 Quiet time (calm)
- 1:00 Basket work (calm)
- 1:15 Ball exercises (heavy work)
- 1:30 Science (calm)
- 1:45 recess (heavy work & preferred activity)
- 2:00 Lego (calm & preferred activity)
- 2:15 Writing (calm)
- 2:30 Going home preparation
- 2:40 iPad free choice (calm & preferred activity)
- 3:00 Walk to the bus
Looking at the colours it is easy to see that there are lots of preferred activities interspersed throughout the day, and calm seat work is almost always followed by heavy work to get the student moving.
A typical six day cycle looks something like this:

Once I have created the schedule the student will be following, it is time to get to the “visual” part of the plan. If you google visual schedule, you will see that a lot of teachers are using Boardmaker for their visuals. These images are universal and great for visual schedules. When I started making my visual schedules, my school didn’t have Boardmaker so my images are all ones that I found online. If the student is old enough and it is something that they would enjoy, sometimes it is fun to have them help choose the visuals. If the teacher is already using visuals for their whole class schedule, I highly recommend using the same visuals.I organize all of my visuals in a template I have created on Microsoft Publisher so that they are all the same size.
It looks something like this:

Once I have found all of the images I need, I print them in colour on cardstock and laminate them. I find that cutting them out before laminating holds the lamination plastic best. I also laminate a coloured file folder. I create the blue and green “first this….then….” boxes. It also gets laminated and then taped to the bottom of the laminated folder (see below). I put two strips of Velcro on the folder (see below), and Velcro on the back of each image. As brand name Velcro isn’t cheap, I am experimenting with bargain Velcro from dollar stores to see how it holds up. The verdict is still out!
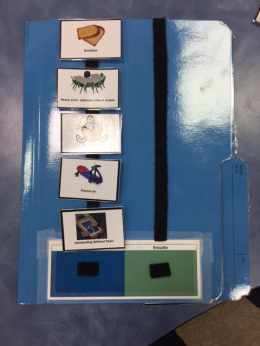
Inside the folder I put 4 strips of Velcro (see below). This is to hold all of the images that are not being used at any given time. For students who have more visuals than I can fit on these strips I also staple a ziplock bag to the back of the folder where we can store visuals that are used less often (fieldtrips, special events, assemblies, etc.).
Now that the visual schedule is created, it is ready to be implemented. In my next post I would like to share how I present it to the student, as well as pointers on successful use of the visual schedule.

One thought on “The Year of the Visual Schedule – Part 2”